If you are a PODS Framework lover or you missed out on the ACF Pro LTD, and now want to use PODS with Oxygen Builder to display the custom fields in a template, then in this post exactly I will show you how to achieve that.
Oxygen is an awesome WordPress builder but it has very few integrations as compared to the other well-established website builders like Elementor, and that is the reason you can’t find a direct Oxygen and PODS integration.
If you want to know the differences between Elementor and Oxygen then click here to learn more.
However, Oxygen has a great Dynamic Data option which can be used to easily display the PODS custom fields within the templates made with Oxygen.
Hence in this post, I will show you how to use PODS with Oxygen to make your life as a WordPress implementer or a web designer a little easier.
If you are trying to display PODS custom fields to an Oxygen template, then I can safely assume that you already know how to create custom fields in PODS Framework.
Therefore without wasting any time let’s dive straight into the Oxygen part implementation.
Add Text-Based PODS Custom Fields in Your Oxygen Template
The very first step is to add a Heading or Text element to your template it’s totally up to your preference which one to add.
Now double click on that particular element to select all, then head over to the insert data button on top of the page and click on it.
As soon as you click on that button you will see a pop-up window with various dynamic data options, but you need to select the Custom Field/Meta option which falls under the Post section.
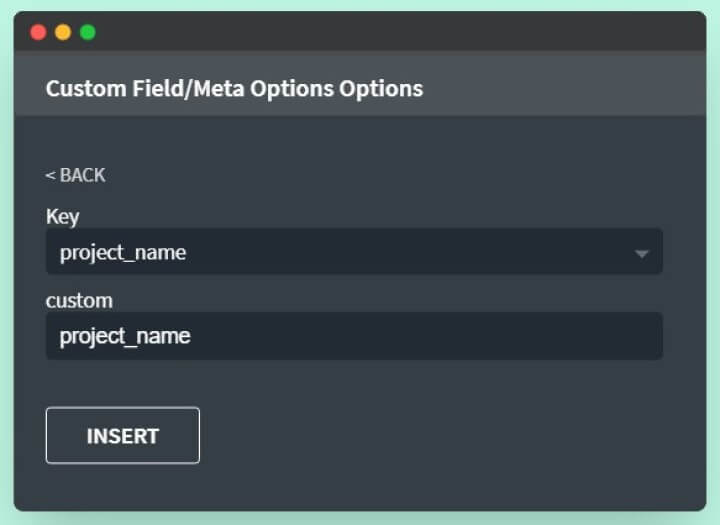
So, now you will see a new screen with two options, the first one is a dropdown menu named Key with a bunch of custom field types to select from and the other option is a field called Custom.
Once you get there, you have two options;
Either you can scroll through and search the required custom field name from the dropdown menu or just insert the PODS Custom Field Name (in this case project_name) to the field option of dynamic data and then hit the Insert button.
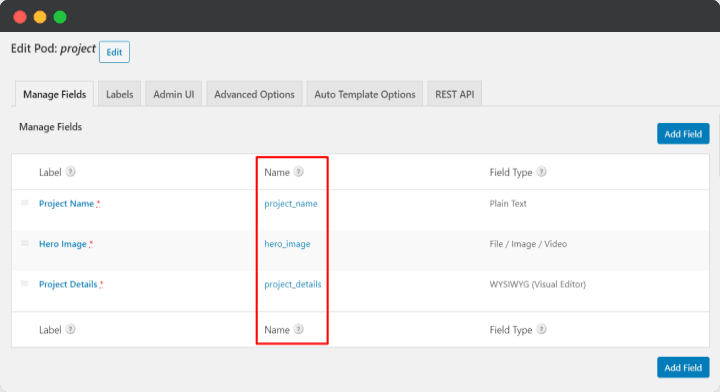
If you follow the above-explained steps properly, then by now your data from the PODS custom field should be visible to the Oxygen template and now you can style the element to make it look as you want.
The Navigation Should Look Like This:
> Open the Oxygen Editor
> Click the +Add Button
> Add a Heading or Text element
> Double click on that particular element
> Hit the Insert data button on top of the page
> Select the Custom Field/Meta option under the Post
> Either scroll and search the custom field name from the dropdown menu or insert the PODS Field Name to the field option
> Hit the available Insert button
Add Image-Based PODS Custom Field in Your Oxygen Template
Adding a text-based PODS field is a much more straightforward way as compared to adding an image-based PODS custom field, as following the same steps I’ve explained above to add custom fields will not work with image-based custom fields.
But not to worry about it anymore as I have brought with me two different approaches to make this work for you guys.
Special thanks to the super helpful Oxygen community members Kevin Pauls and Matt Hias for sharing their solutions with us which I am going to explain to you guys.
Method #1: Register a PHP Function to Display PODS Image Custom Field in Your Oxygen Template
Now follow the same steps as I am going to show you now.
Install and activate the Code Snippets plugin, then add a new code snippet and just copy the PHP code snippet you can see below and paste it to register a basic function to call the image in your template.
/*Display PODS Custom Image Field in Oxygen Template */
function sw_pods_image_in_oxygen($field_name) {
$post_id = get_the_ID();
$image = get_post_meta($post_id,$field_name, true);
$image = $image['ID'];
$image = wp_get_attachment_url($image);
return $image;
}
Now in certain situations, you might want to call the images with a different available size in WordPress like thumbnail, medium, or large other than the full size which is the default size if there is nothing specified by you.
Therefore, Matt has modified the code snippet and added an optional second parameter $size to predefine the PODS image size that you want to showcase to your Oxygen template.
The best part about this method is that this solution not only works with plain Oxygen custom post templates but also works well with the Oxygen Repeaters.
Hence now you can copy and paste the below code block to your function file using the Code Snippet plugin and you are good to go.
Note: Only use the below code if you want to predefine the image size for the PODS custom field images, otherwise you can simply use the above code for basic function setup.
/* Display PODS Custom Image Field with Any Availaable Size Among The Full, Thumbnail, Medium, or Large in Oxygen Template */

function sw_pods_image_in_oxygen($field_name, $size = 'full') {
$post_id = get_the_ID();
$image = get_post_meta($post_id, $field_name, true);
if (!$image) return '';
$image_id = $image['ID'];
$image_resource = wp_get_attachment_image_src($image_id, $size);
if (!$image_resource) return '';
$image_url = $image_resource ? $image_resource[0] : '';
return $image_url;
}
Steps to Add PODS Image Using Oxygen Editor
The next step is to add an Image element to your template and then select the image and you will see a Data button within the Image URL field hit that button.
Now you will see a pop-up window the same as earlier but with some different options within it, you just click over to the PHP Function Return Value button under the Advanced section.
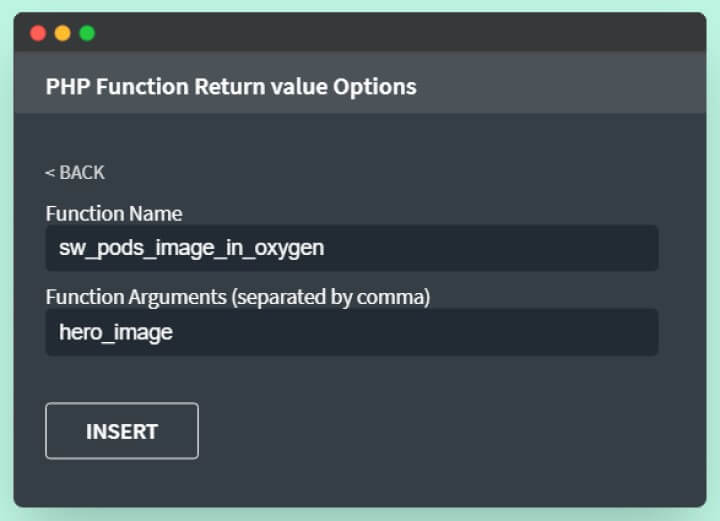
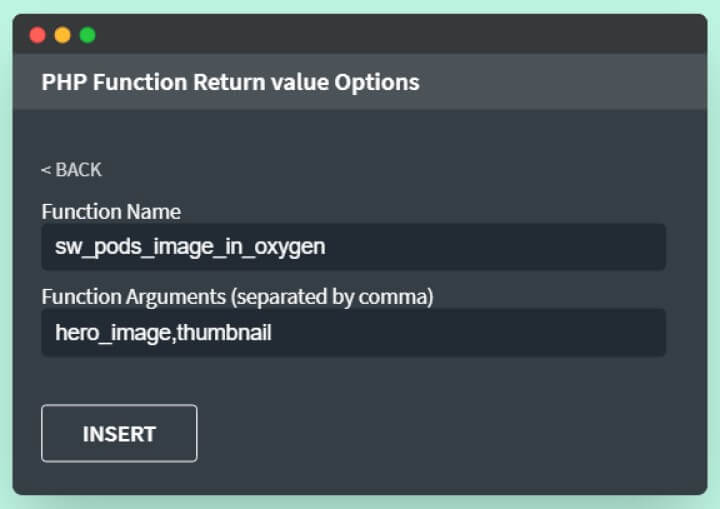
As soon as you click on that option you will find two fields; a Function Name and a Function Arguments (separated by a comma).
In the Function Name field, you need to insert “sw_pods_image_in_oxygen” from the first line of the code snippet I shared with you.
And in the Function Arguments, you need to insert only the PODS custom image field name, like “hero_image” in this case for default image size just like the below example;
And image field name along with the image size attribute you need, such as “hero_image,thumbnail” or any other size you want among thumbnail, medium, or large.
Check the below example for reference, and once you’re done with that just hit the Insert button.
The Navigation Should Look Like This:
> Open the Oxygen Editor
> Click the +Add Button
> Add an Image element
> Double click on that particular element
> Hit the Insert data button from the image URL field
> Select the PHP Function Return Value button under the Advanced section
> Insert “sw_pods_image_in_oxygen“ in the Function Name field
> Insert the PODS custom image field name “your_image_field_name” for the default size image and “your_image_field_name,thumbnail” or any other size you want among thumbnail, medium, or large in the Function Argument field
> Hit the available Insert button
Method #2: Use a “._src” Add PODS Image Custom Field in Your Oxygen Template
Now in this method, you won’t be required to register any PHP functions to display your PODS custom image fields to the Oxygen template, and I would say that this is the much easier way so far to achieve the same thing.
In this case, the steps are almost the same as you have followed in the #1 method, and the best part about it is that you can safely ignore everything related to the Code Snippets here.
Steps to Add PODS Image Using Oxygen Editor
Just follow the same above steps to add the image element and insert data but this time you need to use the Meta/Custom Field under the post option.
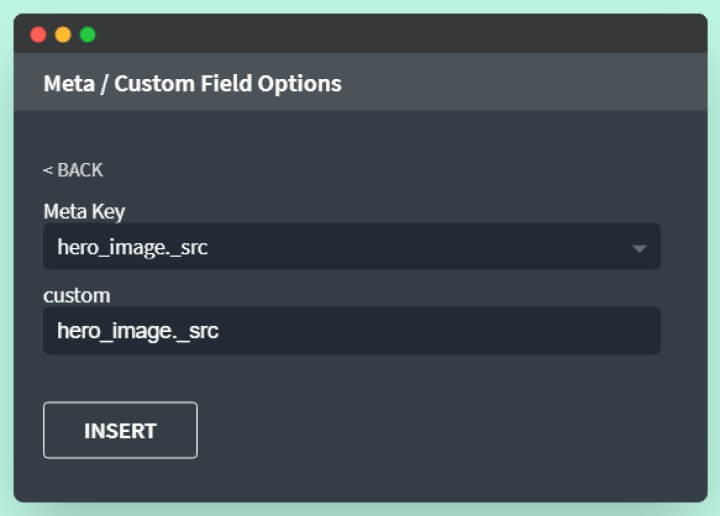
After that just find the image custom field name from the Meta Key dropdown or just insert the PODS image field name in the Custom field, and then just add this bit of text “._src” with that PODS field name.
It should look like this: your_image_field_name._src in this case hero_image._src, now you are good to go as it should bring the image from the PODS custom field and show it in the Oxygen template you are building.
Now if you want to use a specific image size for the PODS images within your Oxygen template then that is also possible with this method #2.
As Magic Matt also found an abracadabra way to use different sizes for Matt’s now world-famous ._src shortcut method to display PODS custom image fields to the Oxygen template.
The best part is that this solution not only works with plain Oxygen custom post templates but also works well with the Oxygen Repeater.
Here are the ways to add different sizes of PODS images to the Oxygen template:
- your_image_field_name._src => For Full Size Image.
- your_image_field_name._src.full => Again For Full Size Image.
- your_image_field_name._src.large => For Large Size Image.
- your_image_field_name._src.medium => For Medium Size Image.
- your_image_field_name._src.thumbnail => For Thumbnail Size Image.

The Navigation Should Look Like This:
> Open the Oxygen Editor
> Click the +Add Button
> Add an Image element
> Double click on that particular element
> Hit the Insert data button from the Image URL field
> Select the Meta/Custom Field option under the Post
> Either scroll and search the required image field name from the dropdown menu or insert the PODS image Field Name to the Field option
> Add this bit of text ._src or ._src.thumbnail or any other size you want among thumbnail, medium, or large just after the PODS Image field name
> Hit the available Insert button
Conclusion
I love PODS because it provides both Custom Post Type and Custom Fields in the same plugin absolutely for free, and I love Oxygen Builder too but it doesn’t integrate with PODS as it does with ACF Pro and Toolbox.
Therefore I was looking for a way to make these two awesome tools work together to build advanced options for my and my client’s websites.
As soon as I found the workaround I started working on it as well as I’ve shared everything I know in this post so that you guys can take the benefits if you need them.
I hope this post was valuable and helpful to you, if yes then please share it with your community so that they also can take advantage of this tutorial.
If you want to learn more about Oxygen Builder then click here to explore the other posts I wrote.
Thanks a lot for spending your precious time on this website.


